
Setting up an email account in Entourage for Mac OS X
This tutorial shows you how to set up Microsoft Entourage to work with your e-mail account.
These settings are similar in other versions of Microsoft Entourage. You can set up previous versions of Microsoft Entourage by using the settings in this tutorial. Please use the data provided to you by your ISP in the fields below for correct name servers.
To Set Up Your E-mail Account in Microsoft Entourage
-
Open the "Entourage" application inside "Macintosh HD", then "Applications", then "Microsoft Office".
-
If this is the first time you have opened Entourage, you will be prompted to set up a new email account. If you have already set up an account in Entourage once before and wish to set up a new email account, simply go to "Entourage", "Account Settings", then "New" and follow the same procedure outlined below:
-
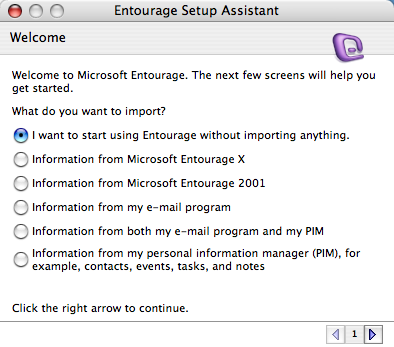
Choose to not import anything.
.png)
-
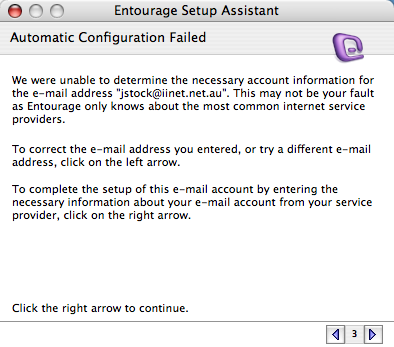
Enter your email address.

-
Note that the error displayed below will always occur – Entourage cannot use Automatic Configuration for your iiNet email account.
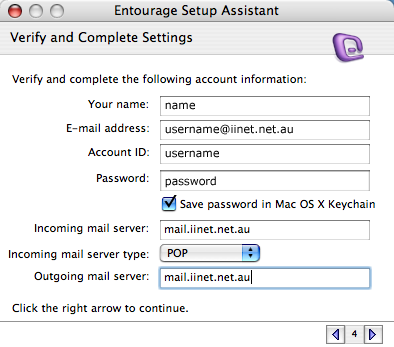
- On the Edit Account window, enter your information as follows:
- Account name
- Enter a name for your account, for example: My Mail, Work, or Home.
- Name
- Enter your first and last name.
- E-mail address
- Enter your e-mail address.
- Account ID
- Enter your e-mail address, again.
- Password
- Enter the password for your e-mail account.
It’s a good idea to save the password to your Mac OS X keychain so that Entourage does not keep prompting you for it. - Incoming mail server (POP server)
- Enter example:pop.yourispname.com as your incoming server
- Incoming mail server type
- POP
- Outgoing mail server (SMTP server)
- Enter example:pop.yourispname.com for your outgoing mail server.
-
NOTE: "mail.yourdomainname.com" is an example, please replace the domain name with your own. both SMTP and POP server addresses are usually identical or mail might be replaced with smtp or pop.
-
You will be prompted to verify your settings. You don’t have to but you can by clicking the "Verify My Settings" button. If you are not connected to the internet this process will fail.
-
If you don’t choose to verify your settings, you’ll be prompted to anyway. Clicking "Skip" will bypass verification.
-
Click "Finish" and the process is complete.


